fredag 7. august 2015

The Yavin Retaliation: Fleet Ambush (Star Wars: Armada)


In the long days of chaos following the destruction of the first Death Star, the Empire tried to make sense of what had happened. Grand Moff Tarkin had arrogantly rushed into destruction without accurately reporting the location of the rebel base. A great number of high-ranking Imperial officers had gone missing, including the dark lord of the Sith, Darth Vader. Emperor Palepatine had withdrawn, and the remaining Imperial authority was in disarray.


The rebellion, as surprised at their own success as any Imperial command, fought to maintain the secrecy of their Yavin base. For months, they continued to operate, rallying from the battle and trying to hold on to their momentum. Eventually rebel command had to concede that the secret location of their base had once again been compromised and a general evacuation was ordered.


Darth Vader suffered several difficult trials following the Battle of Yavin, but ultimately the fallen Jedi survived and managed to reassume his position within the Empire. Impatient to enact his vengeance, Darth Vader assembled a retaliatory strike force of several Star Destroyers that he lead back to Yavin.


Having been forewarned of the Empire’s knowledge of their base, the rebels were fortunately in the final stages of evacuation when Darth Vader’s fleet arrived. As the Star Destroyers erupted from hyperspace, a stern guard fleet of rebel frigates and corvettes moved to intercept: their mission to buy the evacuation a little more time.

The Objective: Fleet Ambush


The Imperial Fleet:

 Victory II-class Star Destroyer "Dominator" (Admiral Screed, Expanded Hanger Bay, XX-9 Turbolasers)

Gladiator II-class Star Destroyer (Assault Concussion Missiles, Nav Team) (see below)

Howlrunner

2x TIE Interceptor Squadrons

7x TIE Fighter Squadrons

Fidor Draygan - Captain of the Gladiator II-class "Vindictive" (free Officer upgrade - no ability)

Draygan is a son of Denon, born to a middle-class family of that Imperial world. Although never considered brilliant, his focus and diligence earned him a commission from the Imperial Academy. His work ethic saw him rise steadily through the Naval ranks, but never earning particularly prestigious assignments. This did not bother Daygan, however; who was proud of eventually earning command of the Vindictive. He was content to fulfill his career diligently carrying out Outer Rim patrol duties, but the events following the Battle of Yavin saw him thrust into unforeseen circumstance. As Darth Vader hastily assembled a retaliatory force to strike at the rebel base of Yavin, the Vindictive was near-at-hand and ordered to support the Dominator.

Although uncomfortable with the situation, Draygan nevertheless recognized the opportunity this presented should he perform to the Sith Lord's satisfaction. Darth Vadar was not known for his forgiving nature, but Draygan put his trust in the stoic work ethic that had seen him successful this far.


The Rebel Fleet:

Nebulon-B Escort Frigate (Mon Mothma, Nav Team, Veteran Captain)

2x CR-90 (Overload Pulse)

CR-90 (Nav Team, Enhanced Armament)

Wedge Antilles (see below)

X-wing Squadron

2x Y-wing Squadron

Edaara Durgen - Pilot (Wedge counts-as)

Edaara hails from the Talay system in the Mid Rim. Her parents were dengu farmers. A local algae grown in large shallow lakes. At the age of seventeen Edaaras family lakes were the victims of an imperial take over to turn the lake districts into a new star port. During the protests that followed, her father was killed by the imperial suppression force. Edaara and her mother fled the system as stow aways to Najiba of the Faj system in the Outer Rim Territories.

Growing up Edaara spent much time to care for her mother. She came to work as a co-pilot on a freighter. At the age of 24 she decided to join the rebel alliance. She quickly displayed a great talent for piloting and has since risen to become commander of Firewing Squadron.

First Player: Rebel player (Marw)

Battle Report:


The Imperial fleet arrived in a tight formation, pouncing upon the lone CR-90 that had strayed too far into the ambush zone.


The force was with the blockade runner, as it escaped Imperial fire relatively unscathed and came about on an escape vector. Meanwhile, the rest of the Rebel fleet began to respond.


The escaping CR-90 came about again, looking to out-flank the Imperial fleet. Although tempted to pursue and box in, Admiral Screed decided against it in favor of maintaining a strong defensive stance against the remaining Rebels.


Seeing an opening and loosing patience, the Admiral ordered the fighters in to clear out the X-wing and Y-wing nuisance. Although successful, the Imperial squadrons got caught in a brutal Rebel crossfire and were mostly wiped out. This opened a clear path to the Vindictive, and in a heroic act of sacrifice another CR-90 shot forward and hit it with a pulse overload, disabling its defenses.


Although the Dominator obliterated the courageous corvette, the damage was already done. Combined fire by the remaining Rebel ships disabled the Vindictive even as they struggled to regain shields. The fire from the Dominator was relentless, but the Rebel pilots did their utmost to escape the worst fields of fire and thus managed to keep their ships intact.

Victory Points: Rebels 135 vs. Imperials 99

Conclusion:

The fierce Rebel counter-assault had robbed the Imperial fleet of their initiative and a great number of their fighter squadrons. The Vindictive was disabled and Howlrunner barely able to limp back to her Dominator.

The Rebels had all reason to be relieved that they had won the opening moves of the battle, but the evacuation of Yavin was still ongoing and there were several Star Destroyers in the system, including an unscratched Dominator.

Edaara had punched out of her X-wing and was fortunate to be amongst those EVA pilots rescued. Captain Draygan found himself in a less fortunate circumstance, however; having failed to anticipate the Rebel's gambit and greatly displeased Lord Vader. The officer knew that unless he got the Vindictive repaired and back in the fight his career would literally have a short life expectancy.


mandag 3. august 2015

The Yavin Retaliation (Star Wars: Armada)


Our next project will be a short cycle (3 evenings) of Star Wars: Armada. My buddy Marw and myself got together last Thursday and discussed what we wanted to achieve with this, and we agreed the principle goal was to get some more experience with the basic format of the game (300 pts fleets).

However, we did not want to waste the opportunity to enjoy a little storytelling so we agreed to add a simple narrative. Marw came up with the idea to set our games right after the battle of Yavin, as the Rebels fled their base. Although they won the battle and destroyed the Death Star, the war was far from over. Marw imagined that a retaliatory strike could have been sent, engaging the Rebels as they made their escape.

We did not want to affect the basic format of play too much, so to represent this campaign we agreed to both take the objectives that Marw suggested to represent the narrative with and play set-up exactly as laid down in the rules, only agreeing that whoever chooses objectives must pick the appropriate objective for that game. This way we would in theory be playing all games exactly as presented in the rules (in order to stick to our principle goal with this cycle).

The three objectives would be Fleet Ambush, Contested Outpost and Advanced Gunnery. This is to represent the Imperial retaliatory fleet ambushing the rebel fleet aiding the evacuation, their battle as the rebels fight protect their assets as they get ready to flee, and the relentless firefight just as the rebels make a run for it!

Sticking to keeping things very simple, we decided that the victor in each of the two first games gets one a free dice re-roll in the following game, while the winner of the last game wins the campaign. This was a minor point, as neither of us felt that winning or losing the campaign really affected the principle goal.

One of the reasons we chose to play Armada was to free up more hobby-time for future cycles. However, it would not be any fun unless we got some new toy to put on the tabletop! I love the work Mel does with Shapways, providing designs for 3D printing various ships for Armada. However, not only did we not have time for anything that extravagant, but also it would go against our principle goal. Instead, I focused on painting up a few of the Wave I squadrons I had not gotten around to yet.

First up are the TIE Interceptors I added to my list:


And some Y-wings that Marw wanted to try out:


It is not much, but enough to add a small sense of hobby achievement for when we play our games.

In order to spice up my excitement I picked up The Old Republic: Legends graphic novel just to add a little Star Wars excitement since I'm currently working on projects from different settings. It did not have much starfighter "candy" in it, but I enjoyed the read nonetheless. I find that reading a little relevant fluff always enriches the game experience, so during this cycle I will be finishing Mercy Kill and finishing Season 6 of the Clone Wars series.

This promises to add up to quite an enjoyable gaming experience. We also sat down and did our lists for the first game, but I'll leave that for the next post.

Cycles of Gaming

I have renamed my Blog and will make a new attempt in getting it underway with a different concept that I originally envisioned.

The past 18 months has been strange as far as the hobby is concerned, which has prompted many reflections regarding how, why and what we play. After a lot of discussions (fueled by copious amounts of coffee and/or beer) several of my gaming group has landed on a "cyclic approach" to gaming where we - in "cycles" - deal with one gaming project at a time as opposed to all of us pursuing multiple games and painting/playing after some random, willy-nilly fashion.

This approach has provided us with several advantages beyond the obvious - getting to play various games in a slightly more predictable schedule. These other advantages have been making planning and communication easier, allowing for more freedom of hobby/painting without losing focus and providing a sense of validation/justification for some of the many gaming purchases made. I have already noticed how inspiration/motivation and my creativity/hobby progress has greatly improved since settling on this approach.

This is something that I want to consolidate in my Blog, which I want to update in relation to the projects our "cycles" we are currently enjoying, providing an anchor for whatever chain of thoughts and hobby achievements I feel like sharing.


søndag 10. februar 2013

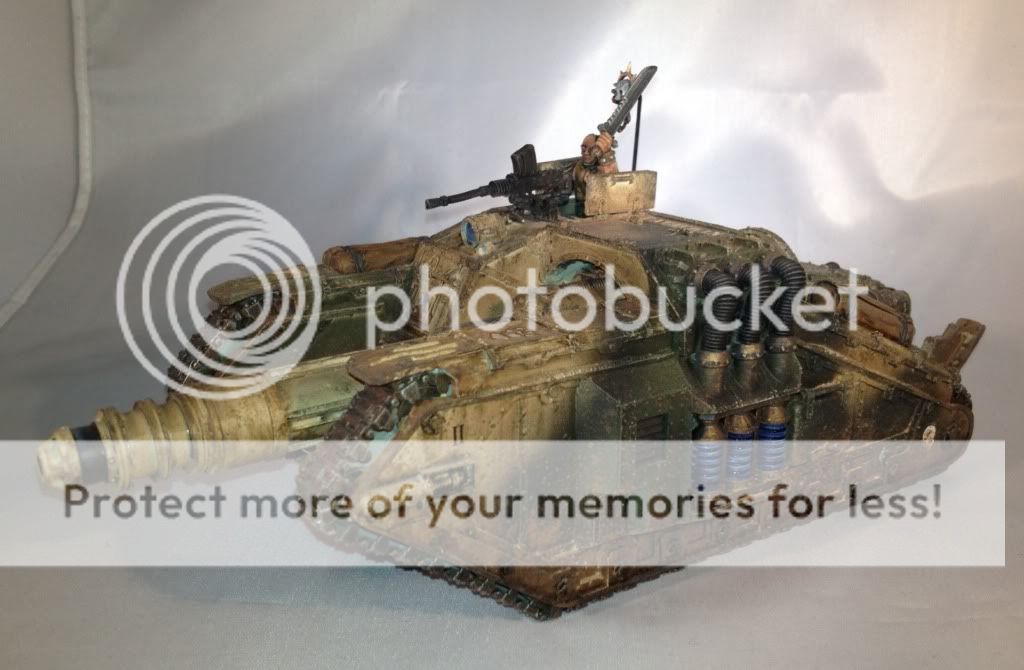
Valdor Tank Hunter

Well I collect, I build, I convert, I paint and I play... but I don't take pictures! And without pictures, there isn't much point in posting to the blog! However, I'm kicked myself in the rear end and pushed myself to start working on that part, and even if the pictures aren't good I'll just have to work with that, learning a little - little by little.


Anyway, back to my Catachan Jungle Fighters. I have a quite a few models to catch up with in terms of presenting them, and I'll spread that out a bit so I can get some regular activity on this page in the weeks and months to come (while learning to take pictures). First up is the first super-heavy I finished for my army, the Valdor Tank Hunter.


I should have applied some dark shadow before adding the tracks and weapon cover, as it turned out I never really got  good enough access to these area to shade them in. Furthermore, I killed a lot of the model's contrast by applying too much flat varnish. Disappointing, but good lessons learned. I'm still reasonably happy with the end result.


Since it was such a rare, technologically unique vehicle, I wanted a Tank Commander that really stood out. So in addition to kit bashing a bionically enhanced tank commander I also added a Servo Skull.


mandag 20. februar 2012

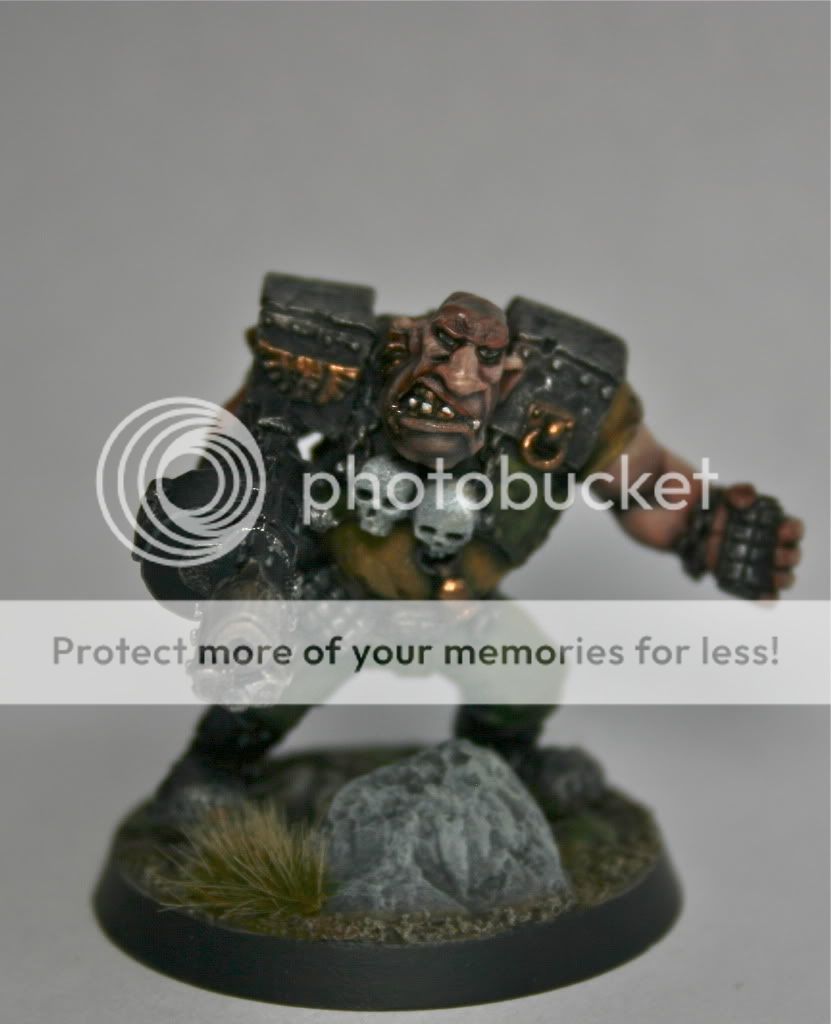
Nork Deddog

The infamous Nork Deddog


I'm slowly working on the Ogryn Auxilia Battle Formation in the background of other projects, using no less than 31 Ogryns to form three solid squads of abhuman brutality. They'll be led by a Commissar Lord based on the Yarrick model, with a tough-as-grox command squad. I'll cover that project at another time, but as a 'teaser' I'll present the one model out of the 31-count - the famous Nork Deddogg!


The project is based on collecting old Ogryns off e-bay for quite some time (it takes a while to get 30-odd Ogryns at a decent price, not to mention stripping and kit-bashing, converting and detailing them). However, I am very excited about this project because despite their questionable role in a game of 40k, they are unmistakably 'Catachan' in their appearance! No self-respecting Jungle Fighter force should deploy to combat without the back-up of these brutes!

Company Command Squad


The first unit I want to finalize is one of my Company Command Squads. My favorite configuration has been three plasma guns, medi-kit, and a plasma pistol for the officer. The ability to put out seven Str 6 AP 2 shots within 12" is lethal, and is usually my answer to Terminators that get too close. I have also tried running the command squad with four plasma guns, but the medi-kit not only tends to keep my overheating guardsmen alive, but has given me that added resilience that has often been useful when they get in a pinch. In addition, I tend to find that where 7 plasma shots can't do the job, 9 isn't that much more useful.

To back up that opinion I did some math and (assuming that I got it right), after five turns a command squad with 3 plasma gunners and a medic will have killed 11.6 Terminators at the loss of guardsman, while the squad with 4 plasma gunners killed 12.3 Terminators at the loss of 3 guardsmen. So my deduction, supported by experience, is that while the lethality is more or less the same, the first squad is more resilient, flexible, and - thus - dependable throughout the game, while the second squad can frontload more damage early in the game.

I would like to add that, from experience, I've found that the 4 plasma gun squad is far more prone to self-detonate from a fistful of 1's and screw up my whole battle plan than it is to get a solid 'alpha strike' and clear a unit off before sustaining the inevitable "Gets Hot!" casualties. So now I never field plasma command squads without either a medic or carapace armor (but I'll leave that math more another time).

Beyond the number of plasma shots in my squad, I've learned two other points from running this unit. First of all, every member of the squad is valuable so bodyguards are great to keep plasma gunners alive when guardsmen start to drop. Secondly, when their ride gets blown my command squad often finds themselves in a crater rather too close to the enemy for comfort - but curiously enough my opponents always tends to ask about powerfists, as power armored players are often loath to loose one or two marines from a "wipe-up crew" sent to clear them out. This has led me to equip my officer with a power fist, as the amount of time its presence has made my opponents try to rapid fire me off the table instead of charging makes it well worth its points (consider that I have a 4+/4+ save vs. incoming fire when in cover).

So my company command squad consists of three plasma guns, a medi-kit, two bodyguards and an officer with powerfist and plasma pistol. Too expensive to be considered optimized, really; but this configuration works very well for me and my style of play.


A final note on their ride. Usually I see Chimeras with hull heavy flamers and multi-lasers in the turret, but since I need these guys within 12" to be efficient I'm much more happy with keeping a heavy bolter on the hull, and mounting the heavy flamer in the turret. This typically gives me more flexibility to position the Chimera itself in such a way that it might block advances and provide cover - and still get an effective template shot.

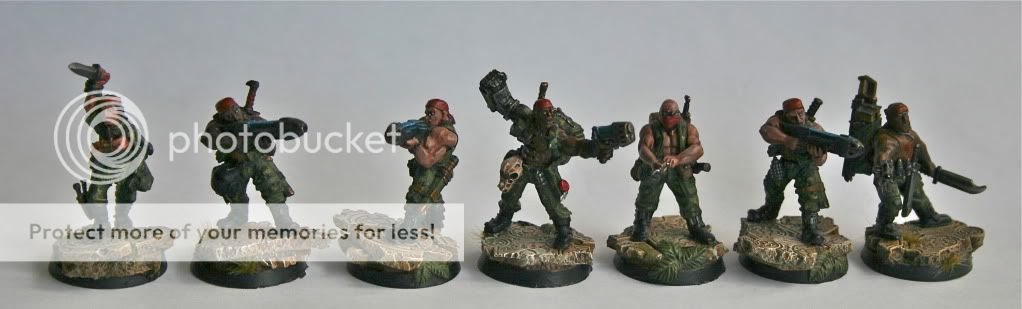
Moving on to the hobby aspect, this squad is already built so there isn't a lot of creativity involved. However, at the time I built these I used the old Straken model, which I converted lightly to represent the officer. Sticking with the old look I used metal plasma gunners, adding some bits to give them a touch of individuality. The medic is one from the current plastic command squad set. I've used bases from Scibor to represent them fighting over jungle ruins, painted tan, which I am very happy with.

I used to run las pistol and CCW on the veterans of my old, 4th edition command squads and because of that, I now have a bunch of guys who aren't equipped to be anything but bodyguards. However, I had spent some time kit bashing my command squads even then, so I find the character of those veterans make perfect bodyguards in the current edition (and on a personal note, I like the idea of the survivors of my old command squad now serving as bodyguards). So, apart from repairing some paint chipping and the occasional loose part, all I needed to do was swap their base and tie them into the rest of the command squad.

This is an old picture, but the Command Squad's Chimera is the one on the left (with the searchlight)


The Chimera was already finished as well, so it didn't take look to finalize this unit - the first step in re-organizing and finishing the W.I.P. projects of my collection! However, it was enough time to imagine a little background of the unit, made easier by the fact that the 72nd 'Blackbacks' are currently involved in a campaign upon the Imperial Planet of Ankhodia Prime.